by/di Alessandra Caraceni
![]() English version below / Vai alla versione italiana
English version below / Vai alla versione italiana
Ingredients
- 125g unsalted butter
- 350g flour
- 200g muscovado sugar (or 100g brown sugar and 150g golden syrup)
- 1 tsp baking soda
- 1/2 tbsp ginger
- 1 tbsp cinnamon
- 1/2 tbsp ground cloves
- a pinch of nutmeg
- grated peel from one orange
- icing sugar
also make sure you have on hand
- a sheet of parchment paper
- some plastic wrap
- an electric mixer (optional)
- a large bowl
- a printer
- removable tape
Preparation
Stage 1: The Dough
- Mix together the dry ingredients: pour the flour, spices, baking soda and grated orange peel in a bowl.
- Let the butter reach room temperature, cut it into pieces and add it into the bowl. Whisk together with an electric mixer (or, if you don't have one, you can combine with your hands, helping yourself with a spoon initially – note that this will take a bit of patience!) until the dough is smooth. If it is too liquid for you to pick it up with your hands, add flour. Take the dough out of the bowl and work it with your hands for a little while.
- Wrap the dough in plastic wrap. Let it sit in the fridge for at least one hour, if possible overnight.
Stage 2: The Shaping
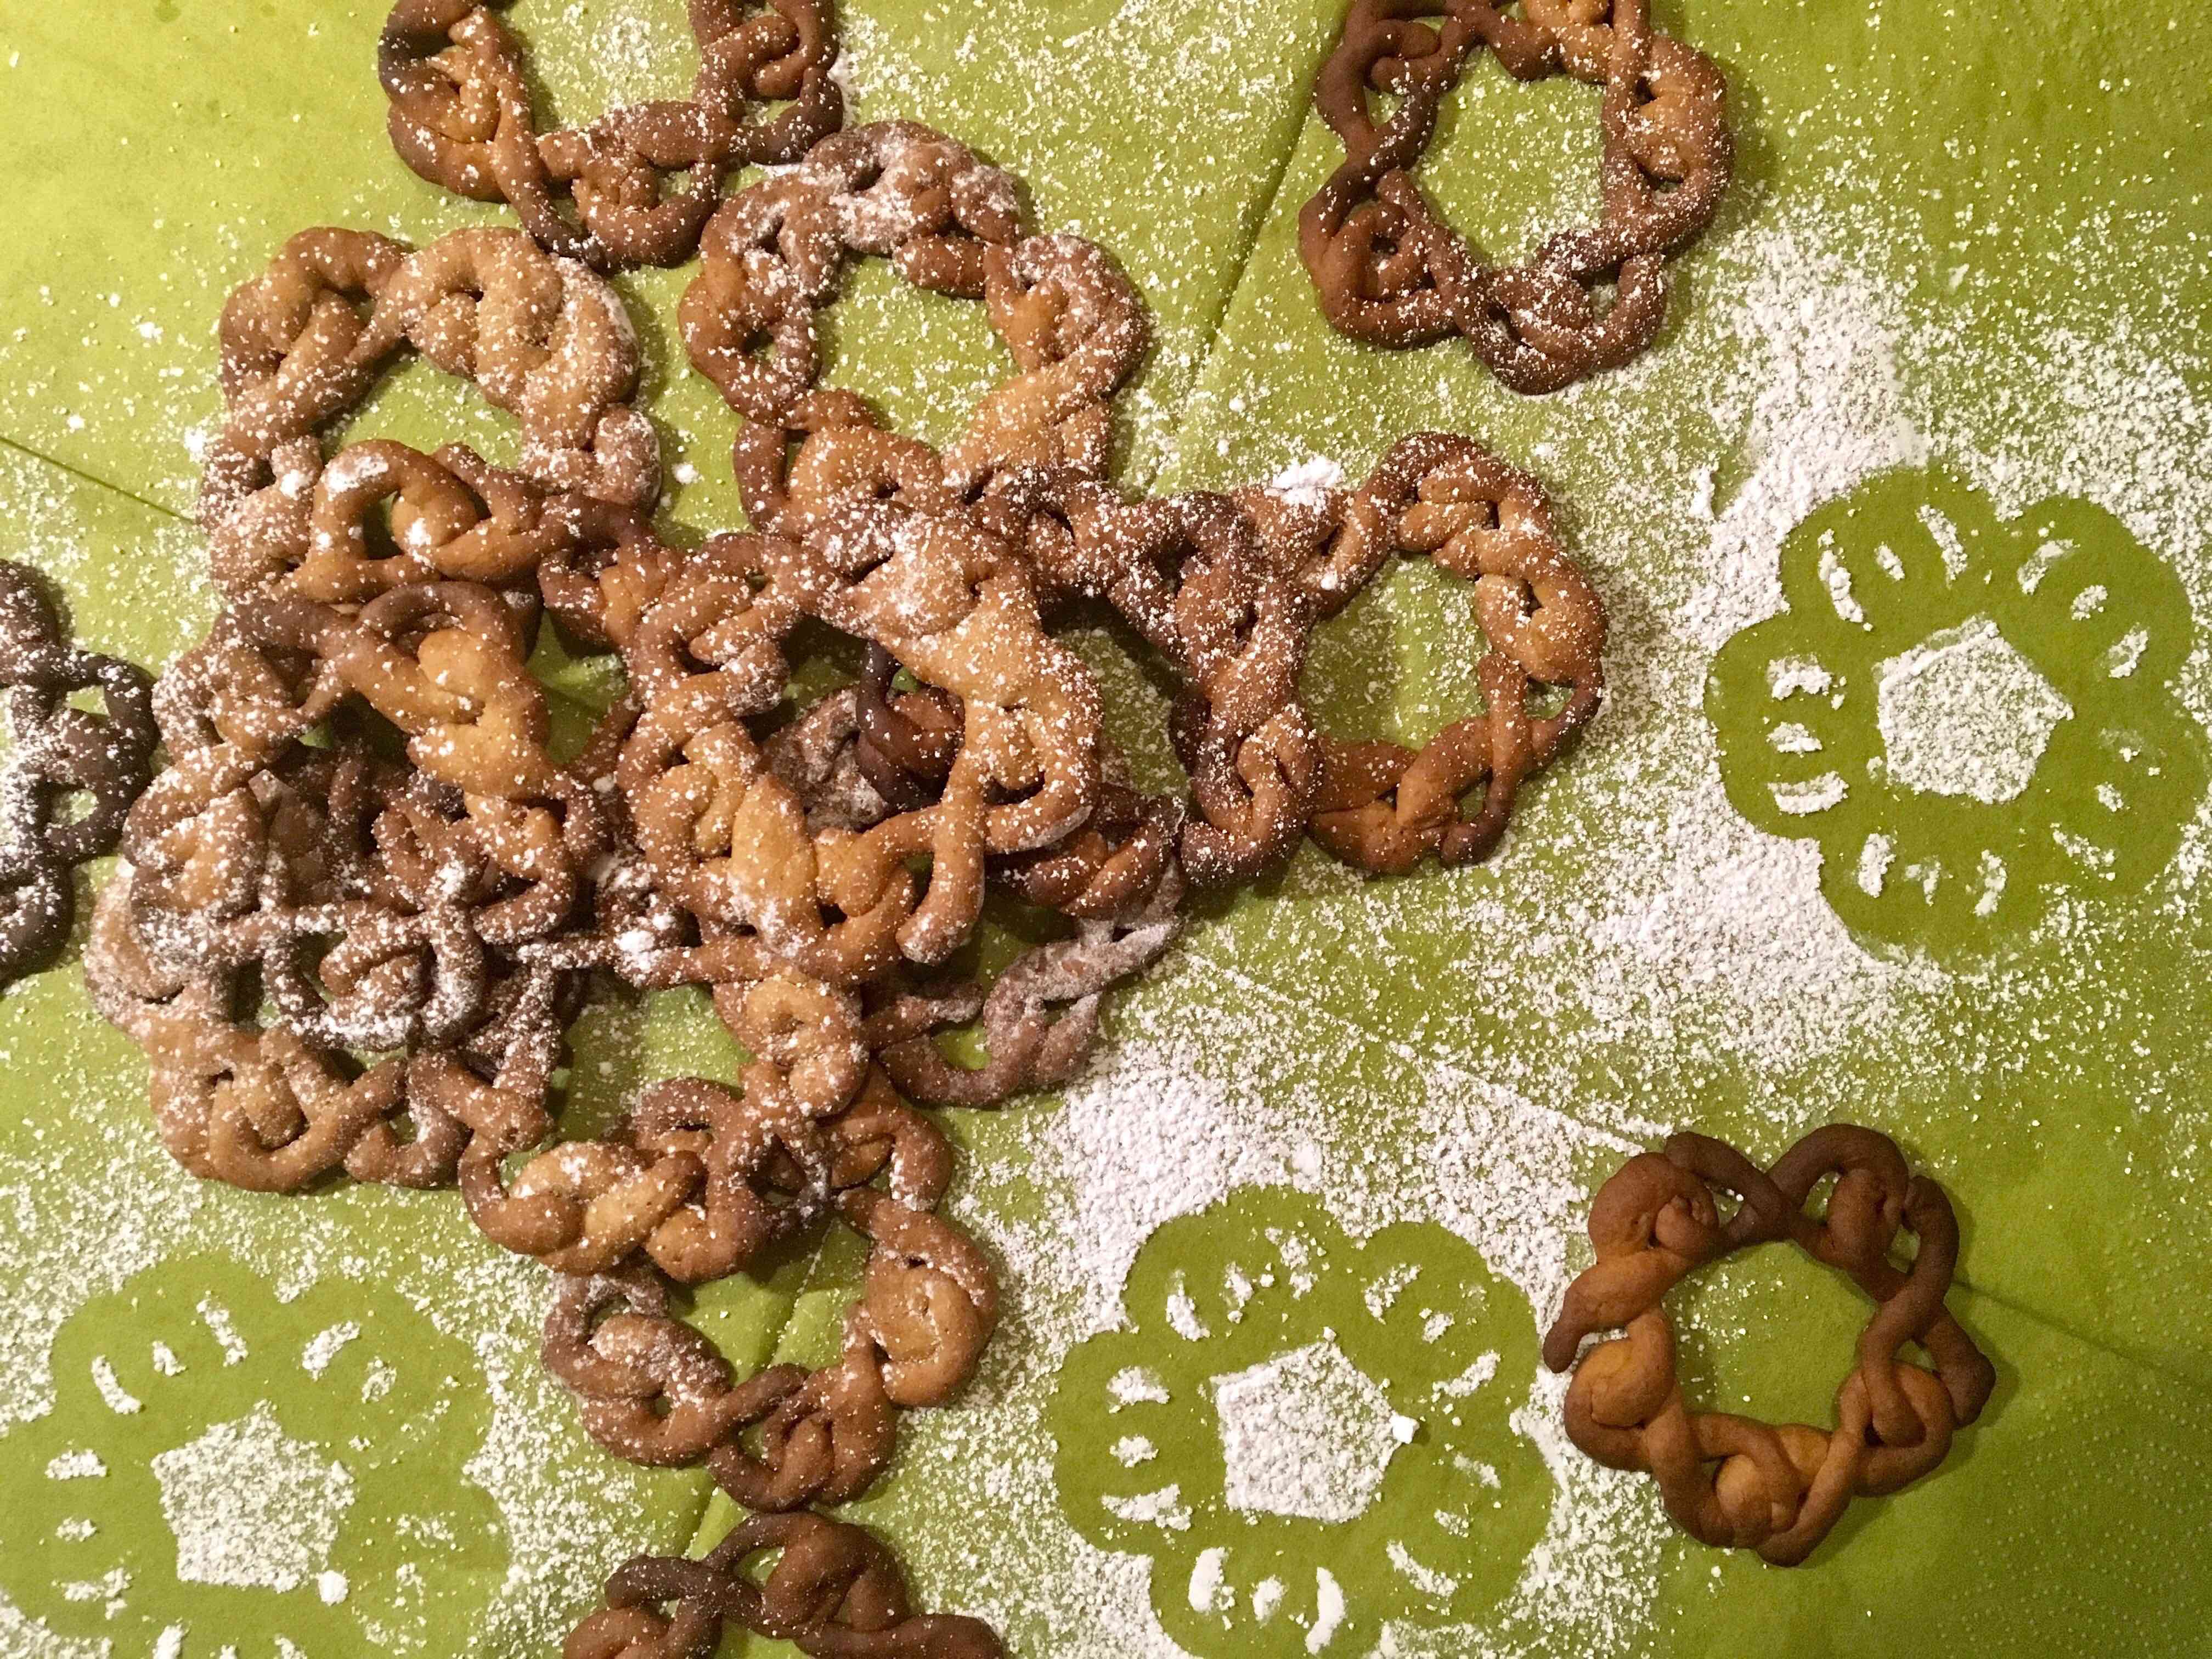
This is where the EGMO logo comes in! Of course, you could simply roll out the dough very thin (up to 5mm) on a sheet of parchment paper, cut out shapes with cookie cutters and, if you like, decorate with the EGMO logo drawn in coloured royal icing or with a cardboard stencil and icing sugar. What I'll teach you how to do is create cookies in the actual EGMO logo shape like those in the picture – yummy!
- Prepare your working surface as follows. Print the template you can download here on an A4 sheet of paper (make sure you print it at 100% scale so it won't shrink it to fit into the printable area) and stick it to your surface with removable tape (make sure there is no flour residue on your hands or surface, or the tape will end up not sticking properly!). Cover the template with a sheet of parchment paper and also anchor that to the surface with removable tape. In the meantime, take the dough out of the fridge and let it warm up.
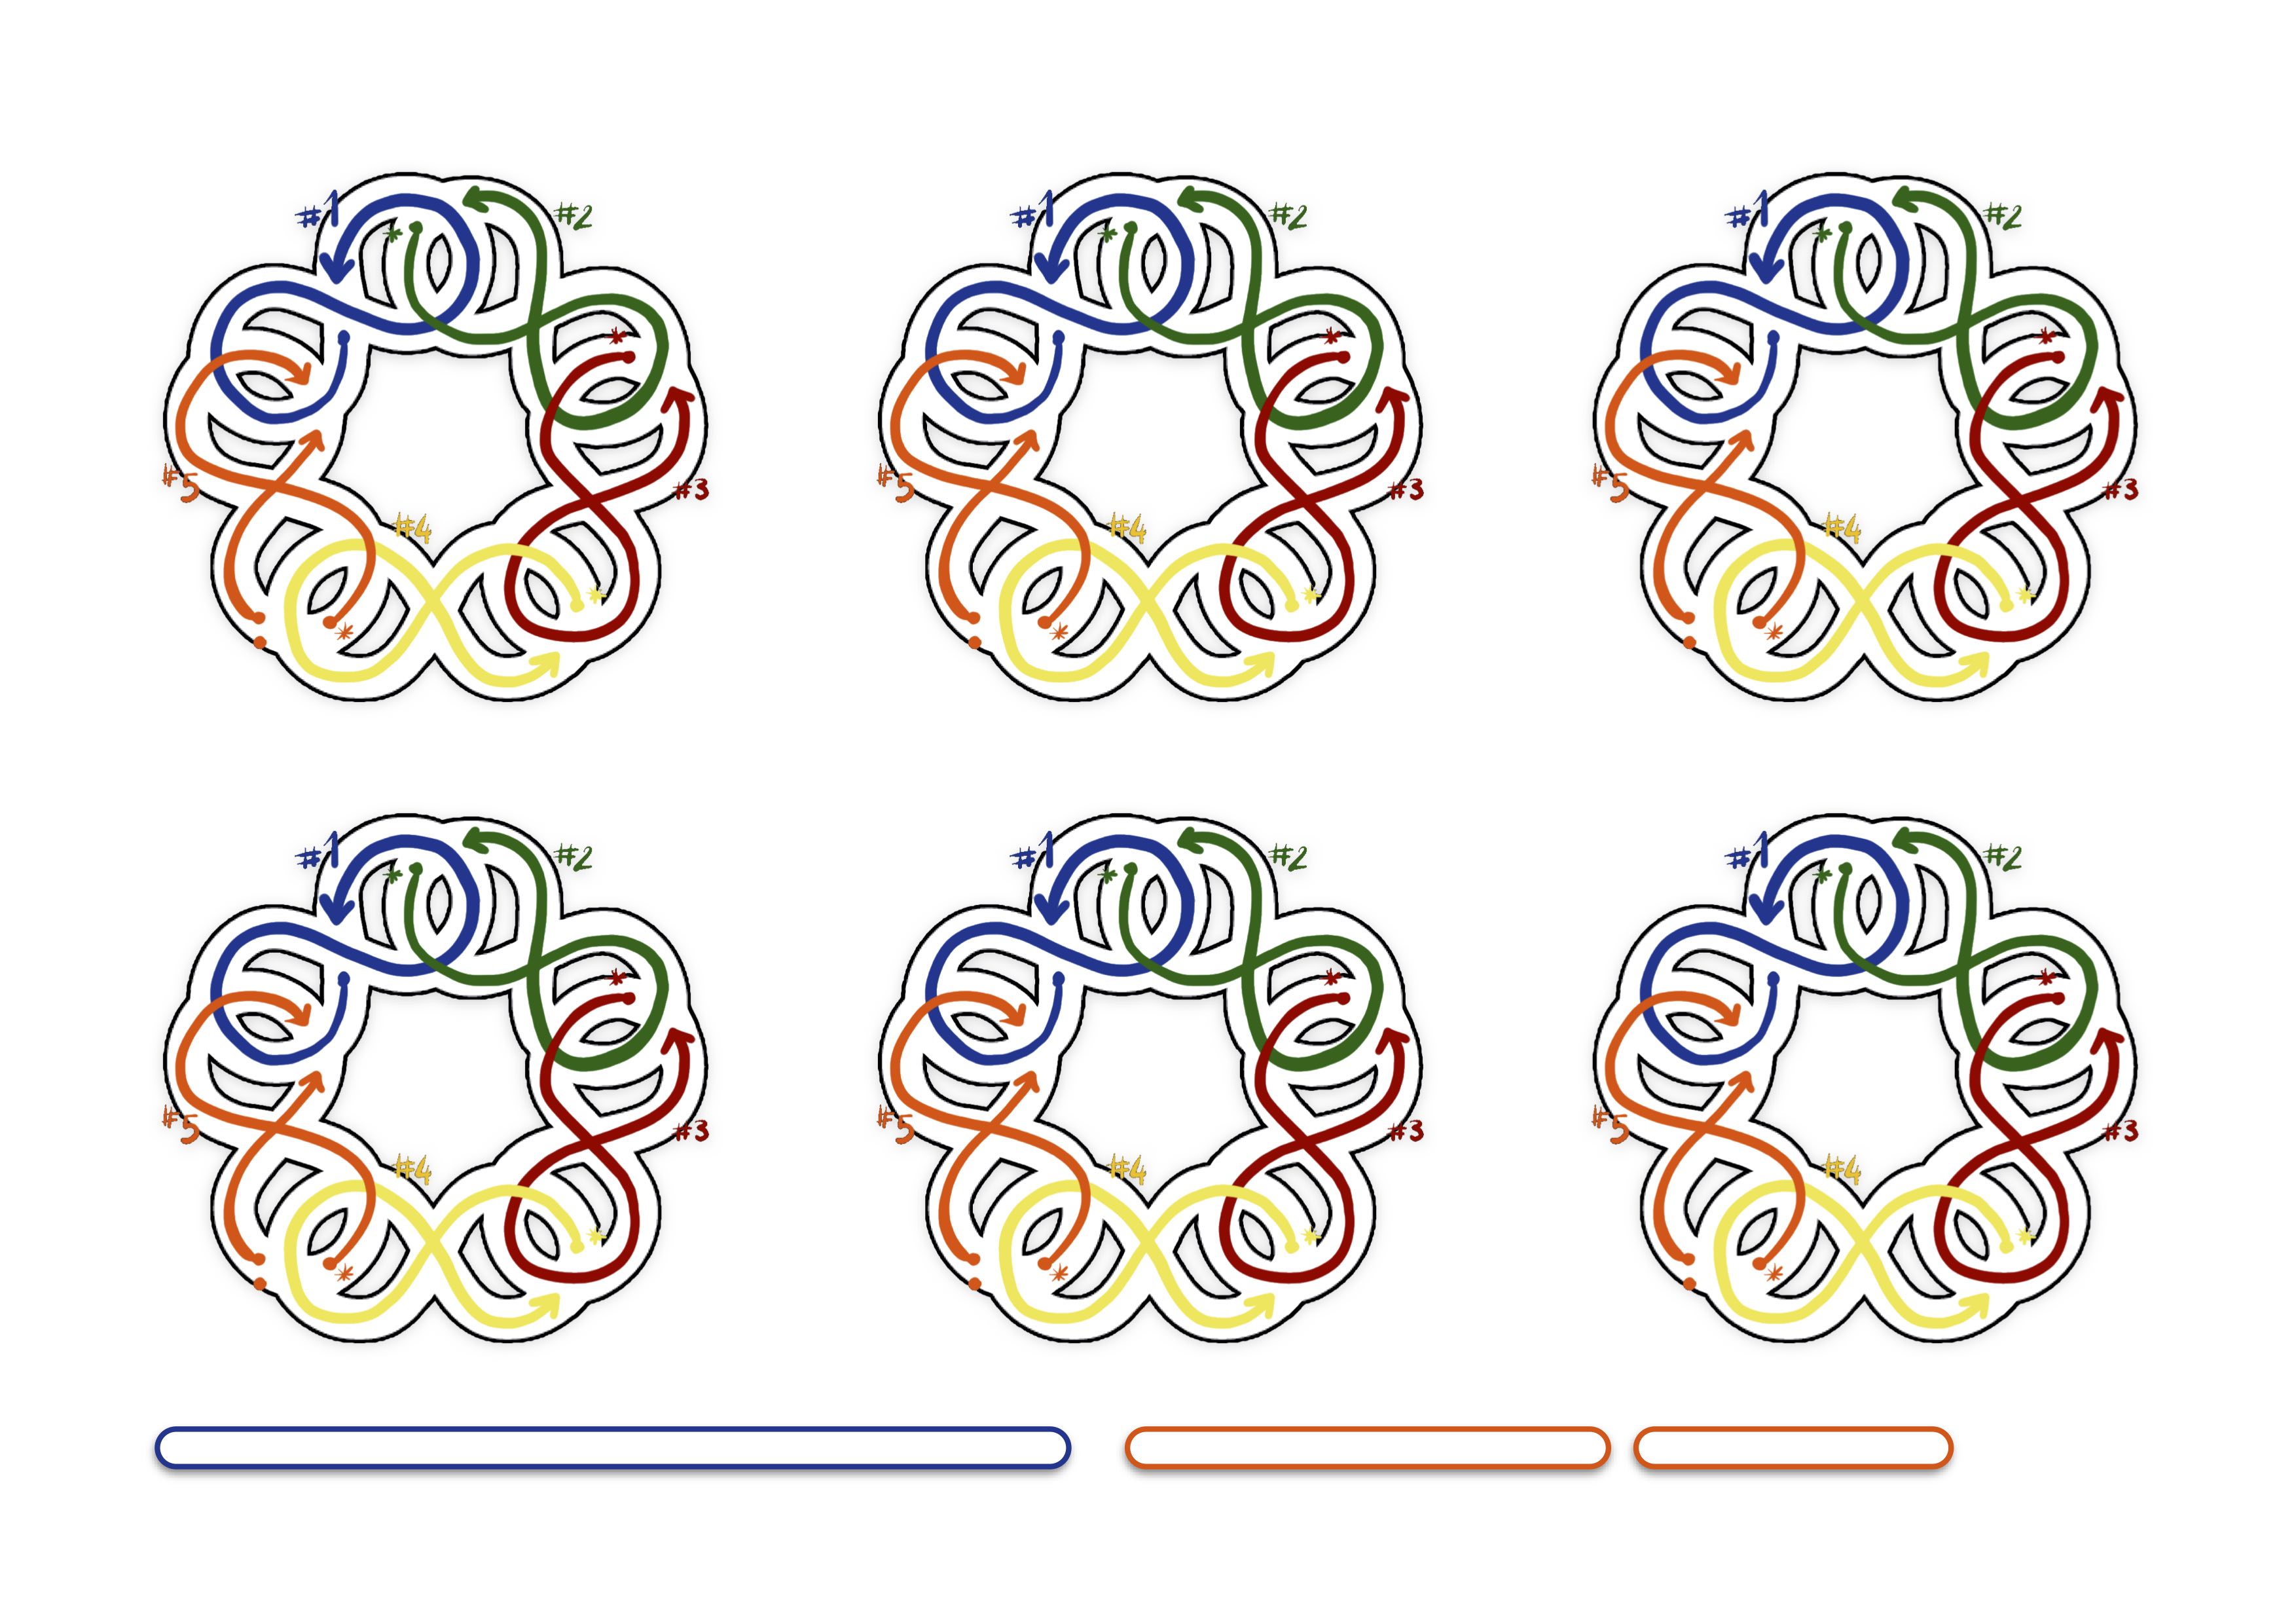
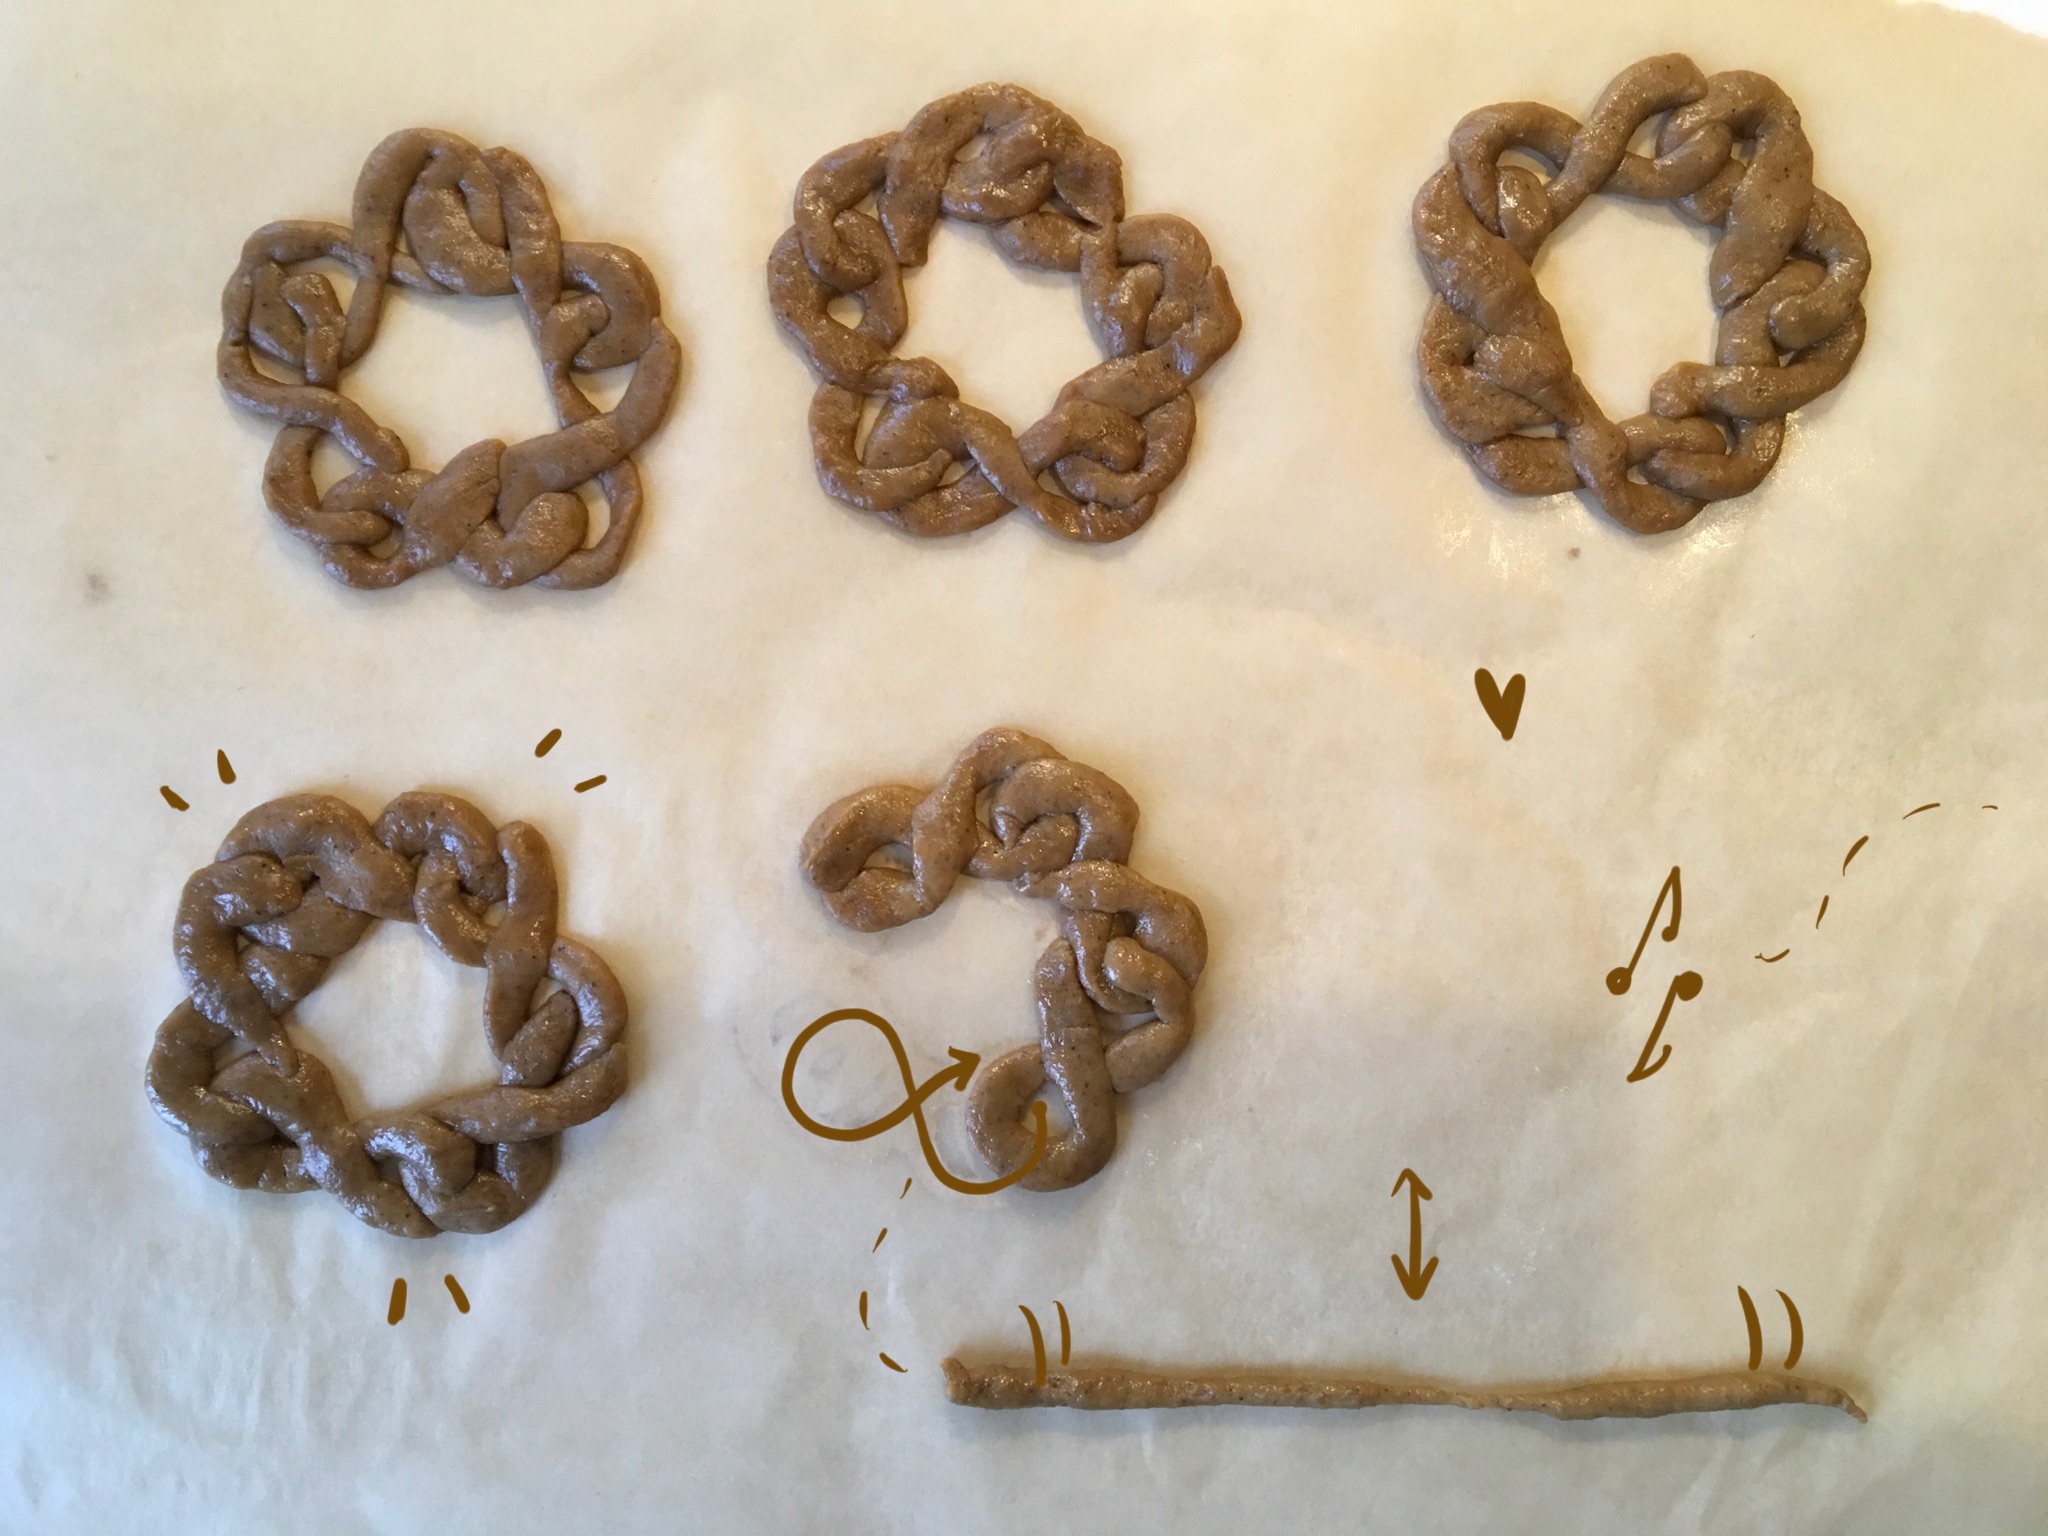
- Now for the shaping! Take your time with your first few cookies: it will become easier as you go. Start by taking a small piece of dough and rolling it into a long, thin strand (you can use the lengths at the bottom of the template as a guide, but you don't need to be extra precise with this). Coil your dough around to form the infinity shape marked with a 1; you can start in the centre and do not need to make the strand go over or under itself: if it's too long, pinch away the excess dough. Tap the shape all over with your fingers to flatten it a little: this will make it look a bit more regular. For the second infinity shape, roll a strand of dough that is a little shorter; place the tip at the point marked with an asterisk, inside the loop of the previous infinity symbol, and coil the strand around, letting it pass over itself in the middle of infinity #2 and ending outside the right loop of infinity #1 (remove any excess dough at the end). Tap gently to flatten a little. Repeat for infinity symbols #3 and #4. For infinity symbol #5, you will need two separate strands of dough, a longer and a shorter one. First, shape the longer one so that it starts at the orange asterisk inside loop #4 and ends inside the left loop of infinity #1. Then, place the shorter one so that it starts at the orange dot outside infinity #4, goes over the longer strand, and ends outside the left loop of infinity #1. Gently tap infinity symbol #5, make sure the dough is connected properly where different strands touch each other, et... voilà – you're done!
TIPS
- For optimal shaping, the dough needs to be malleable, but it's best if it's slightly cooler than room temperature, so that it stays a little more firm and does not fall apart in your hands.
- If you find it difficult to roll thin strands of dough on the parchment paper, try changing surface: the dough may be sticking to the parchment.
- In general, if the dough is too sticky, sprinkle it (and your hands) with flour.
- When you're done shaping a cookie, tap the surface gently so that the thickness of the cookie is more or less constant – this will help it cook evenly!
Stage 3: The Cooking
- Preheat your oven to 180°C.
- Place the parchment paper with your cookies on a baking tray and bake for about 4-6 minutes, or until the cookies are golden-brown. Notice that you should not bake EGMO logo cookies together with different shaped cookies, because the latter will take longer to cook! Just watch your cookies carefully while in the oven so as not to burn them: the thin strands of dough cook quickly, and turn nice and crispy.
- Remove cookies from the oven, let them cool, and sprinkle them with icing sugar if you wish: your beautiful EGMO gingerbread cookies are ready!
Presentation tips
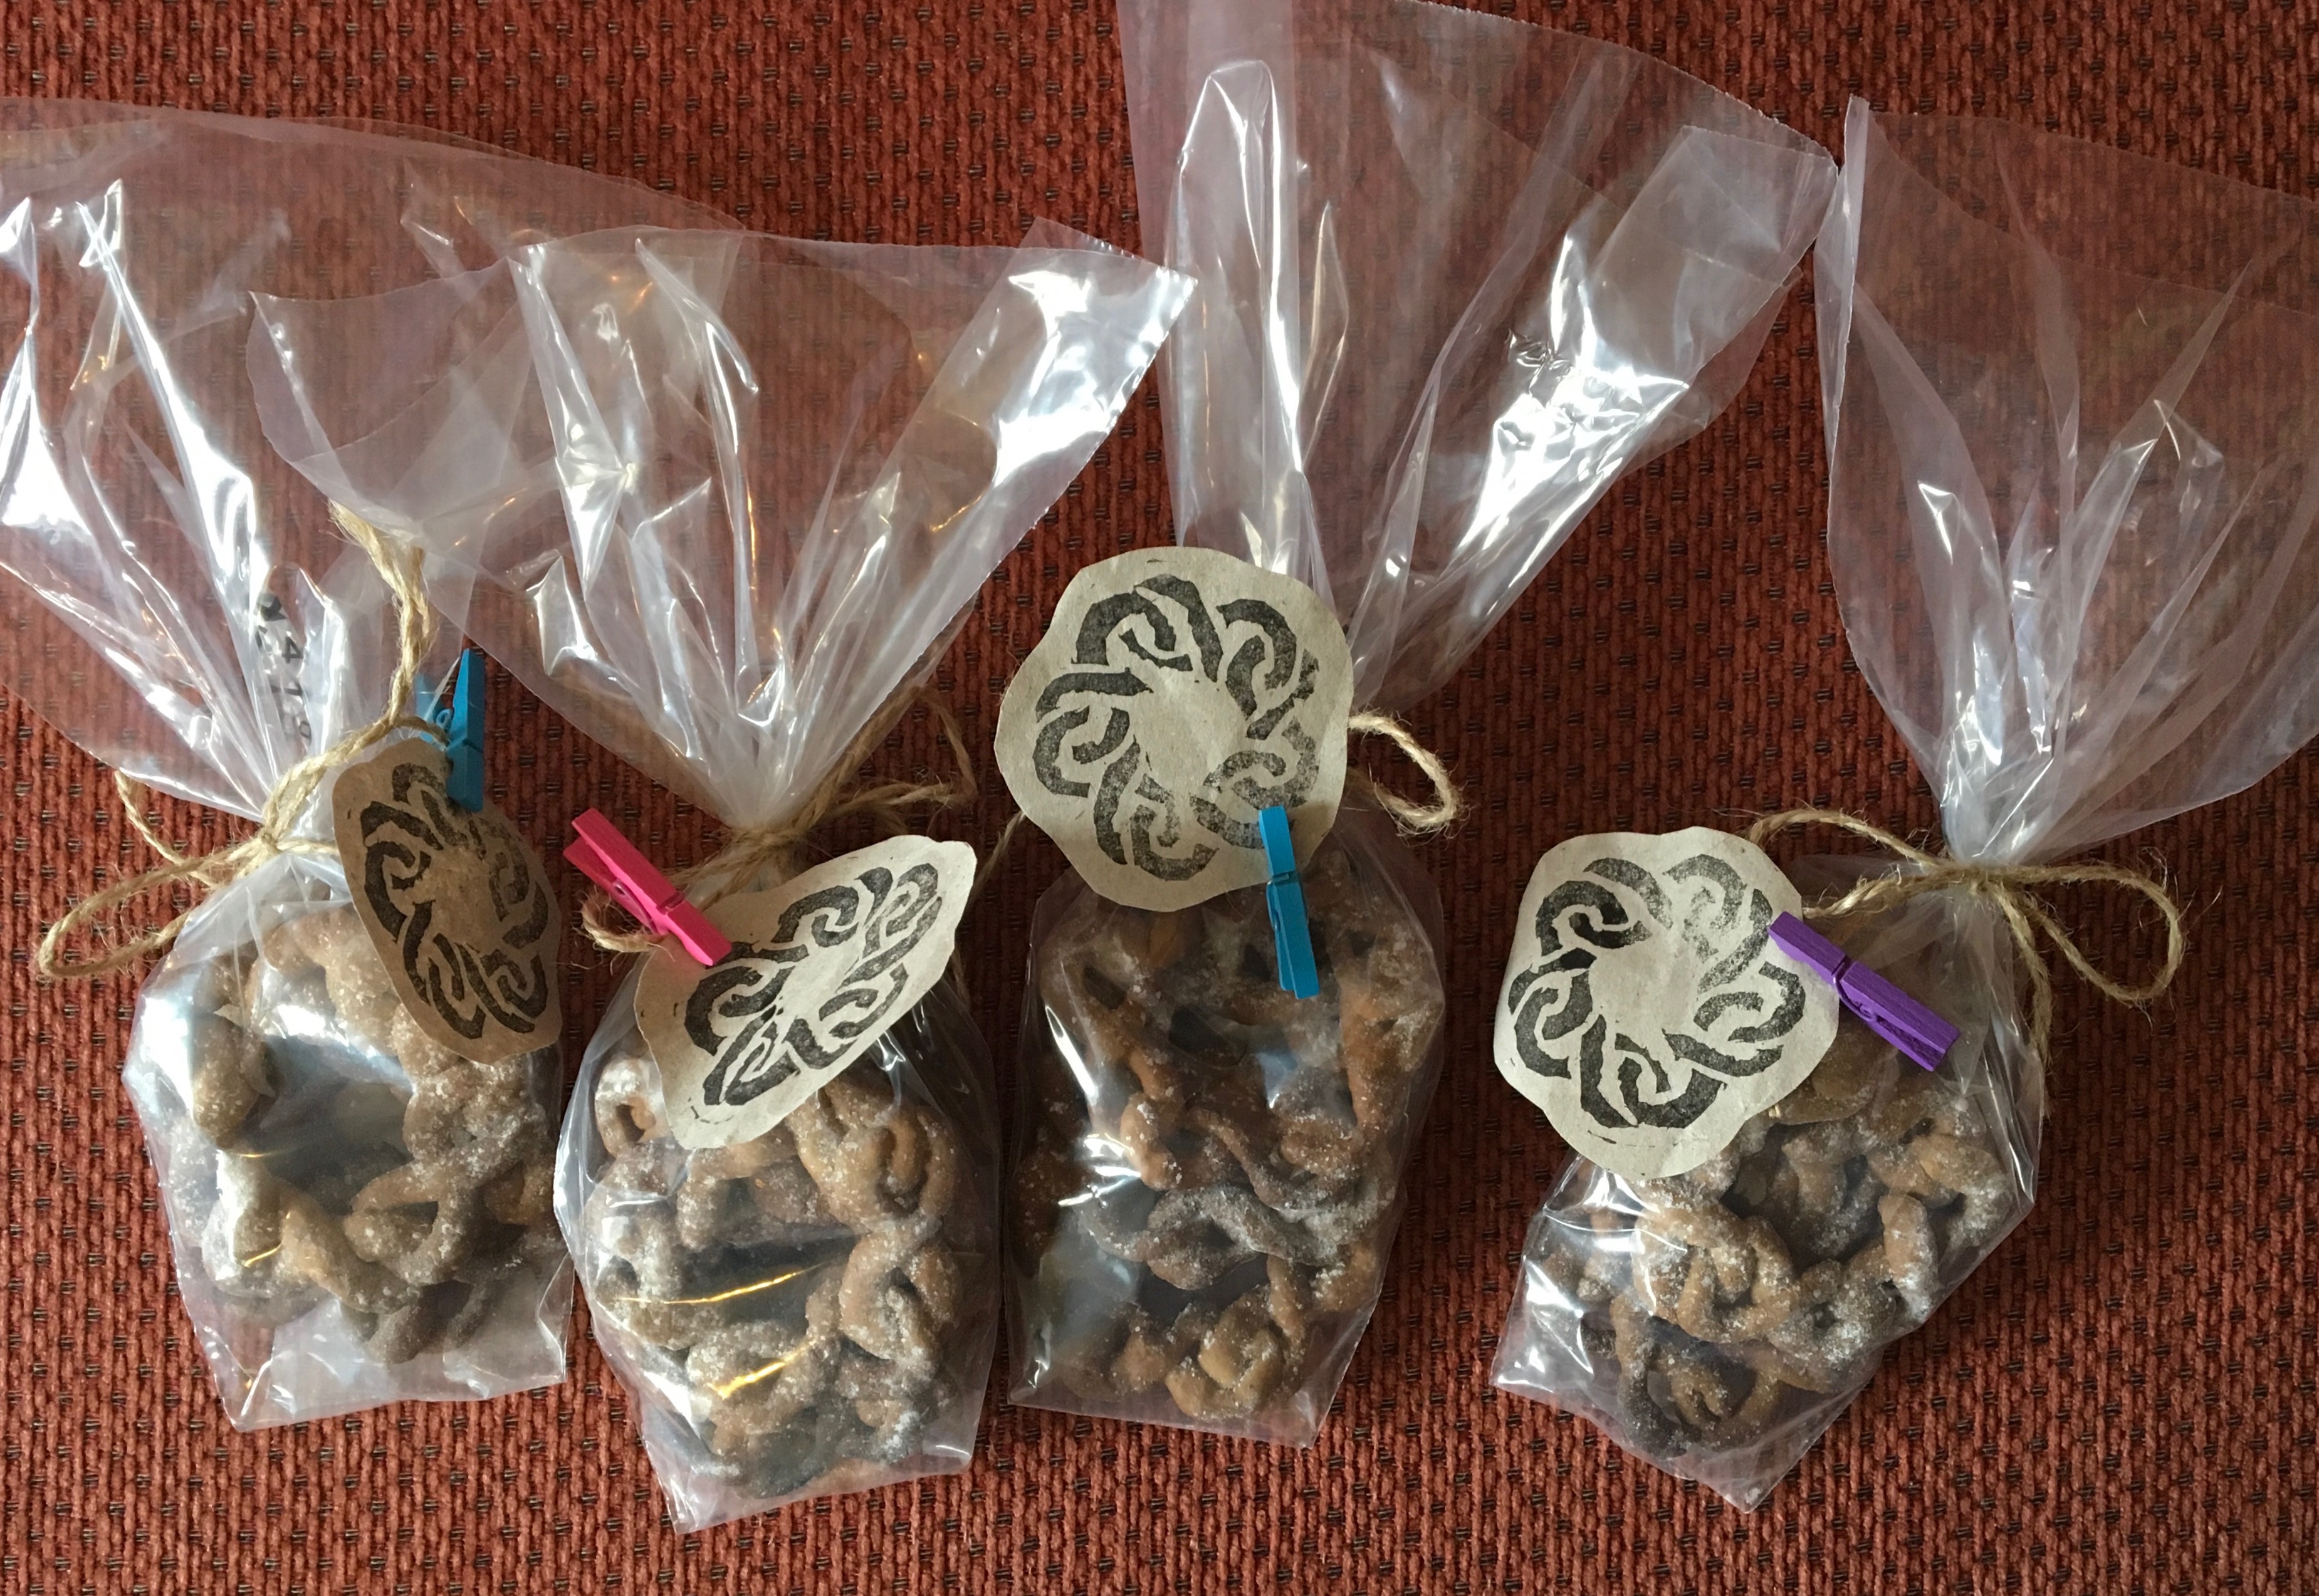
EGMO logo cookies are perfect as a Christmas gift for your maths friends! I made small gift bags of cookies with recycled materials I had on hand: I used plastic piping bags (from Poundland: they were super-cheap!) to make the cookie bags, by sticking the end of the piping bag's triangle shape to the back with some cute washi tape. I filled with cookies and closed the bags with some twine. For the tag, you can use any miniature-size Christmas card; however, if you order a lot of stuff from the internet like I do, you're sure to have brown packing paper lying around; using it for wrapping and/or gift tags – especially when paired with the twine – gives your gifts a very trendy, hand-made and rustic vibe! The only thing that could further enhance this look is a hand-made stamp: do you like the result from my EGMO logo one? Comment on facebook or tweet us at EGMO2018 if you're curious how I made it, and I may just share all of my stamp-making secrets with you guys in a future blog post!
![]() Versione italiana a seguire / Back to English
Versione italiana a seguire / Back to English
Ingredienti
- 125g di burro (non salato)
- 350g di farina 00
- 200g di zucchero muscovado (o 100g di zucchero di canna e 150g di melassa)
- 1 cucchiaino di bicarbonato
- 1/2 cucchiaio di zenzero
- 1 cucchiaio di cannella
- 1/2 cucchiaio di chiodi di garofano in polvere
- 1 pizzico di noce moscata
- buccia grattugiata di un'arancia
- zucchero a velo
Inoltre controllate di avere a portata di mano
- un foglio di carta da forno
- della pellicola trasparente
- un mixer elettrico (opzionale)
- una ciotola capace
- una stampante
- scotch di carta
Preparazione
Parte 1: l'impasto
- Mischiate gli ingredienti asciutti: versate la farina, le spezie, il bicarbonato e la buccia d’arancia grattugiata in una ciotola.
- Portate il burro a temperatura ambiente, tagliatelo a pezzi e aggiungetelo alla ciotola. Amalgamate il tutto con un mixer elettrico (se non ne avete uno, potete impastare con le mani, aiutandovi inizialmente con un cucchiaio – tenete conto che questo richiederà un po’ di pazienza!) fino ad avere un impasto omogeneo. Se fosse troppo liquido da prendere in mano, aggiungete un po’ di farina. Prendete l’impasto dalla ciotola e lavoratelo un po’ con le mani.
- Avvolgete l’impasto nella pellicola trasparente. Lasciate riposare in frigorifero almeno un'ora, meglio tutta la notte.
Parte 2: la forma
Questo è il punto in cui entra in gioco il logo EGMO! Naturalmente avete sempre la possibilità di stendere l’impasto sulla carta da forno, con uno spessore di 5mm, tagliare i biscotti con le vostre formine preferite ed eventualmente decorarli con il logo EGMO disegnato con glassa colorata o con uno stencil di cartone e zucchero a velo. Quello che vi insegnerò è come ottenere biscotti nella forma del logo EGMO, come quelli in figura – gnam!
- Preparate il piano di lavoro come segue. Stampate il modello che trovate qui su un foglio di carta A4 (attenzione a stamparlo a scala 100%, in modo da non ridurre le dimensioni per stare nell’area stampabile) e attaccatelo al piano di lavoro con dello scotch (fate attenzione che non sia rimasta farina sulle vostre dita o sulla superficie, altrimenti lo scotch non rimarrà attaccato!). Coprite il modello con la carta da forno e fissate anch’essa con lo scotch alla superficie. Intanto tirate l’impasto fuori dal frigorifero e lasciate che riprenda temperatura.
- È arrivato il momento di dare una forma ai nostri biscotti! Prendetevi un po’ di tempo in più per i primi: una volta presa la mano diventa più facile. Iniziate prendendo un po’ dell’impasto e facendone una stringa lunga e sottile (potete usare le guide in fondo alla pagina del modello per determinare la lunghezza, ma non serve essere troppo precisi). Intrecciate l’impasto per formare il simbolo di infinito indicato con 1; potete iniziare al centro e non serve che che facciate passare la stringa sopra o sotto se stessa: se fosse troppo lunga, staccate la parte di troppo. Schiacciate delicatamente l’infinito con le dita, in modo da appiattirlo un po’: questo lo farà sembrare un po’ più regolare. Per il secondo infinito, arrotolate una stringa di impasto un po’ più corta; mettete un'estremità in corrispondenza del punto marcato con un asterisco, dentro l’anello del precedente simbolo di infinito e intrecciate la stringa tutto attorno, facendola passare sopra se stessa al centro dell’infinito numero 2 e finendo al di fuori dell’anello di destra dell’infinito numero 1 (anche in questo caso, rimuovete eventuale impasto in eccesso). Appiattite delicatamente con le dita. Ripetete per gli infiniti numero 3 e 4. Per il simbolo d’infinito numero 5 avrete bisogno di due stringhe d’impasto, una più lunga e una più corta. Come prima cosa disponete la più lunga delle due in modo che inizi in corrispondenza dell’asterisco arancione all’interno dell’anello numero 4 e finisca all’interno dell’anello di sinistra dell’infinito numero 1. A questo punto stendete la stringa più corta in modo che inizi in corrispondenza del punto arancione all’esterno dell’infinito numero 4, passi sopra la stringa più lunga e finisca all’esterno dell’anello di sinistra dell’infinito numero 1. Schiacciate delicatamente l’infinito numero 5, controllate che l’impasto sia congiunto correttamente laddove stringhe diverse si incontrano e… voilà, ecco fatto!
CONSIGLI
- Per il massimo agio nel creare la forma del biscotto, l'impasto dev'essere malleabile, ma idealmente leggermente più fresco che a temperatura ambiente, in modo che rimanga abbastanza sodo e non vi si sfaldi fra le mani.
- Se avete difficoltà nel creare le stringhe rotolando l'impasto sulla carta da forno, provate a cambiare superficie: l'impasto potrebbe aderirle troppo facilmente.
- In generale, se l'impasto è appiccicoso, cospargetelo di farina (e mantenete uno strato di farina sulle mani).
- Quando avete finito di formare un biscotto, picchiettate leggermente con i polpastrelli su tutta la superficie in modo da rendere lo spessore più o meno omogeneo – in questo modo la cottura risulterà uniforme!
Parte 3: la cottura
- Preriscaldate il forno a 180°C.
- Ponete la carta da forno con i biscotti su una teglia e cuocete per 4-6 minuti circa, in ogni caso finché i biscotti non risultino bruniti. Notare che non è il caso di cuocere i biscotti a forma di logo EGMO assieme a biscotti di altre forme, perché tendenzialmente questi ultimi richiederanno una cottura più lunga! Tenete d'occhio i vostri biscotti durante la cottura perché non si brucino: le stringhe sottili d'impasto cuocciono velocemente e diventano subito belle croccanti!
- Togliete la teglia dal forno, lasciate raffreddare i biscotti e cospargeteli infine di zucchero a velo se desiderate: i vostri bellissimi biscotti EGMO sono pronti!
Consigli per la presentazione
I biscotti a forma di logo EGMO sono perfetti come regalo di Natale per i vostri amici matematici! Io ho creato dei sacchettini da regalare con materiale riciclato che avevo a portata di mano: ho usato delle tasche da pasticcere di plastica (comprate dall'equivalente inglese di un "tutto a un euro", quindi a pochissimo!), piegandole e assicurando la punta del triangolo sul retro con del nastro adesivo decorativo. le ho riempite con i biscotti e chiuse con dello spago. Naturalmente, si può completare il sacchettino-regalo con qualunque biglietto di Natale di piccole dimensioni; tuttavia, se come me ordinate un sacco su internet, avrete certamente un po' di carta da pacchi uscita dagli imballagi in giro per casa: usarla come carta da regalo o per bigliettini ed etichette – specialmente se combinata con lo spago – dà ai vostri pacchetti un'aria rustica e fatta a mano che è molto di moda! L'unica cosa che manca per completare il look è un timbro fatto da voi: che ve ne pare del mio a forma di logo EGMO? Se siete curiosi di sapere come l'abbia creato, commentate su facebook o twittateci @EGMO2018: ci potrebbe essere un futuro post su come creare timbri personalizzati in serbo per voi!
 Alessandra is a PostDoc in Probability at the University of Bath and has been part of the Italian Mathematical Olympiad organising team since 2006. She has participated in all past editions of EGMO, some as Deputy Leader and some as Leader of the Italian team. She is one of the main organisers of EGMO 2018: as of late, you will mostly find her answering EGMO-related emails, doing graphic design work for this very website, coming up with surprises that will hopefully await you in Florence, or playing Hanabi.